This article is obsolete. A lot has changed since 2018, both the documentation and ADF contain a lot of key information, so I recommend that you refer to the official sources like “Delta copy”, or “ADF templates” link: https://docs.microsoft.com/en-us/azure/data-factory/solution-template-delta-copy-with-control-table
This post explains things that are difficult to find even in English. That’s why I will break my rule and will not write it in my native language! Po wersję polską zapraszam do google translate :>
Table of Contents
Introduction
Loading data using Azure Data Factory v2 is really simple. Just drop Copy activity to your pipeline, choose a source and sink table, configure some properties and that’s it – done with just a few clicks!
But what if you have dozens or hundreds of tables to copy? Are you gonna do it for every object?
Fortunately, you do not have to do this! All you need is dynamic parameters and a few simple tricks 🙂
Also, this will give you the option of creating incremental feeds, so that – at next run – it will transfer only newly added data.
Mappings
Before we start diving into details, let’s demystify some basic ADFv2 mapping principles.
- Copy activity doesn’t need to have defined column mappings at all,
- it can dynamically map them using its own mechanism which retrieves source and destination (sink) metadata,
- if you use polybase, it will do it using column order (1st column from source to 1st column at destination etc.),
- if you do not use polybase, it will map them using their names but watch out – it’s case sensitive matching!
- So all you have to do is to just keep the same structure and data types on the destination tables (sink), as they are in a source database.
Bear in mind, that if your columns are different between source and destination, you will have to provide custom mappings. This tutorial doesn’t show how to do it, but it is possible to pass them using “Get metadata” activity to retrieve column specification from the source, then you have to parse it and pass as JSON structure into the mapping dynamic input. you can read about mappings in official documentation: https://docs.microsoft.com/en-us/azure/data-factory/copy-activity-schema-and-type-mapping
String interpolation – the key to success
My entire solution is based on one cool feature, that is called string interpolation. It is a part of built-in expression engine, that simply allows you to just inject any value from JSON object or an expression directly into string input, without any concatenate functions or operators. It’s fast and easy. Just wrap your expression between @{ ... } . It will always return it as a string.
Below is a screen from official documentation, that clarifies how this feature works:

Read more about JSON expressions at https://docs.microsoft.com/en-us/azure/data-factory/control-flow-expression-language-functions#expressions
So what we are going to do? :>
Good question 😉
In my example, I will show you how to transfer data incrementally from Oracle and PostgreSQL tables into Azure SQL Database.
All of this using configuration stored in a table, which in short, keeps information about Copy activity settings needed to achieve our goal 🙂
Adding new definitions into config will also automatically enable transfer for them, without any need to modify Azure Data Factory pipelines.
So you can transfer as many tables as you want, in one pipeline, at once. Triggering with one click 🙂
Every process needs diagram :>
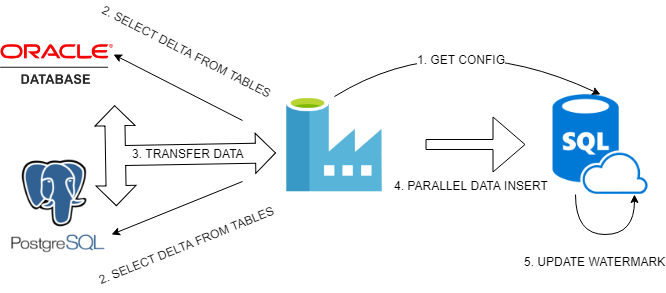
Basically, we will do:
- Get configuration from our config table inside Azure SQL Database using Lookup activity, then pass it to Filter activity to split configs for Oracle and PostgreSQL.
- In Foreach activity created for every type of database, we will create simple logic that retrieves maximum update date from every table.
- Then we will prepare dynamically expressions for SOURCE and SINK properties in Copy activity. MAX UPDATEDATE, retrieved above, and previous WATERMARK DATE, retrieved from config, will set our boundaries in WHERE clause. Every detail like table name or table columns we will pass as a query using string interpolation, directly from JSON expression. Sink destination will be also parametrized.
- Now Azure Data Factory can execute queries evaluated dynamically from JSON expressions, it will run them in parallel just to speed up data transfer.
- Every successfully transferred portion of incremental data for a given table has to be marked as done. We can do this saving MAX UPDATEDATE in configuration, so that next incremental load will know what to take and what to skip. We will use here: Stored procedure activity.
About sources
I will use PostgreSQL 10 and Oracle 11 XE installed on my Ubuntu 18.04 inside VirtualBox machine.
In Oracle, tables and data were generated from EXMP/DEPT samples delivered with XE version.
In PostgreSQL – from dvd rental sample database: http://www.postgresqltutorial.com/postgresql-sample-database/
I simply chose three largest tables from each database. You can find them in a configuration shown below this section.
Every database is accessible from my Self-hosted Integration Runtime. I will show an example how to add the server to Linked Services, but skip configuring Integration Runtime. You can read about creating self-hosted IR here: https://docs.microsoft.com/en-us/azure/data-factory/create-self-hosted-integration-runtime.
About configuration
In my Azure SQL Database I have created a simple configuration table:

Id is just an identity value, SRC_name is a type of source server (ORA or PG).
SRC and DST tab columns maps source and destination objects. Cols defines selected columns, Watermark Column and Value stores incremental metadata.
And finally Enabled just enables particular configuration (table data import).
This is how it looks with initial configuration:

Create script:
|
1 2 3 4 5 6 7 8 9 10 11 12 13 14 15 16 17 18 19 20 21 22 23 24 |
SET ANSI_NULLS ON GO SET QUOTED_IDENTIFIER ON GO CREATE TABLE [load].[cfg]( [id] [SMALLINT] IDENTITY(1,1) NOT NULL, [SRC_name] [NVARCHAR](128) NOT NULL, [SRC_tab] [NVARCHAR](128) NOT NULL, [DST_tab] [NVARCHAR](128) NOT NULL, [Cols] [NVARCHAR](MAX) NOT NULL, [WatermarkColumn] [NVARCHAR](128) NOT NULL, [WatermarkValue] [DATETIME] NOT NULL, [Enabled] [BIT] NOT NULL, CONSTRAINT [PK_load] PRIMARY KEY CLUSTERED ( [id] ASC )WITH (STATISTICS_NORECOMPUTE = OFF, IGNORE_DUP_KEY = OFF) ON [PRIMARY] ) ON [PRIMARY] TEXTIMAGE_ON [PRIMARY] GO ALTER TABLE [load].[cfg] ADD CONSTRAINT [DF__cfg__WatermarkVa__4F7CD00D] DEFAULT ('1900-01-01') FOR [WatermarkValue] GO |
EDIT 19.10.2018
Microsoft announced, that now you can parametrize also linked connections!
Let’s get started (finally :P)
Preparations!
Go to your Azure Data Factory portal @ https://adf.azure.com/
Select Author button with pencil icon:

Creating server connections (Linked Services)
We can’t do anything without defining Linked Services, which are just connections to your servers (on-prem and cloud).
- Go to
 and click
- Find your database type, select and click

- Give all needed data, like server ip/host, port, SID (Oracle need this), login and password.
- You can
 if everything is ok. Click Finish to save your connection definition.
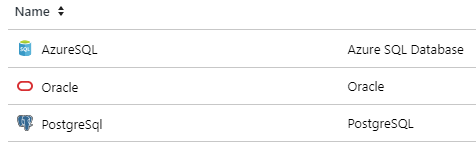
I have created three connections. Here are their names and server types:
Creating datasets
Creating linked services is just telling ADF what are connection settings (like connection strings).
Datasets, on the other hand, points directly to database objects.
BUT they can be parametrized, so you can just create ONE dataset and use it passing different parameters to get data from multiple tables within same source database 🙂
Source datasets
Source datasets don’t need any parameters. We will later use built-in query parametrization to pass object names.
- Go to
 and click + and choose
- Choose your datataset type, for example

- Rename it just as you like. We will use name: “ORA”
- Set proper Linked service option, just like this for oracle database:

- And that’s it! No need to set anything else. Just repeat these steps for every source database, that you have.
In my example, I’ve created two source datasets, ORA and PG

As you can see, we need to create also the third dataset. It will work as a source too, BUT also as a parametrizable sink (destination). So creating it is little different than others.
Sink dataset
Sinking data needs one more extra parameter, which will store destination table name.
- Create dataset just like in the previous example, choose your destination type. In my case, it will be Azure SQL Database.
- Go to
 , declare one String parameter called “TableName”. Set the value to anything you like. It’s just dummy value, ADF just doesn’t like empty parameters, so we have to set a default value.
 - Now, go to
 , set Table as dynamic content. This will be tricky :). Just click “Select…”, don’t choose any value, just click somewhere in empty space. The magic option “Add dynamic content” now appears! You have to click it or hit alt+p.
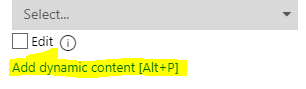
- “Add Dynamic Content” windows is now visible. Type: “@dataset().TableName” or just click “TableName” in “Parameters” section below “Functions”.
- The table name is now parameterized. And looks like this:


Parametrizable PIPELINE with dynamic data loading.
Ok, our connections are defined. Now it’s time to copy data :>
Creating pipeline
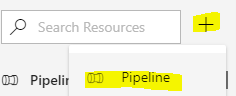
- Go to you ADF and click PLUS symbol near search box on the left and choose “Pipeline“:
- Reanme it. I will use “LOAD DELTA“.
- Go to Parameters, create new String parameter called ConfigTable. Set value to our configuration table name: load.cfg . This will simply parametrize you configuration source. So that in the future it would be possible to load a completely different set of sources by changing only one parameter :>
- In case you missed it, SAVE your work by clicking “Save All” if you’re using GIT or “Publish All” if not ;]

Creating Lookup – GET CFG
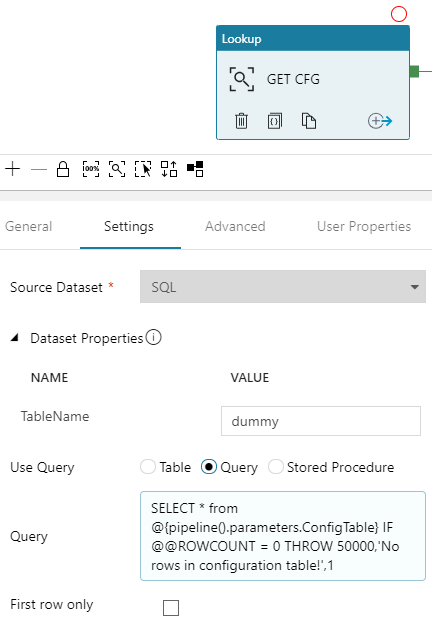
First, we have to get configuration. We will use Lookup activity to retrieve it from the database.
-
- Drag and drop
 into your pipline
 - Rename it. This is important, we will use this name later in our solution. I will use value “GET CFG“.
- In “Settings” choose

- Now, don’t bother TableName set to dummy :> Just in “Use Query” set to “Query“, click “Add dynamic content” and type:
12SELECT * from @{pipeline().parameters.ConfigTable}IF @@ROWCOUNT = 0 THROW 50000,'No rows in configuration table!',1 - Unmark “First row only“, we need all rows, not just first. All should look like this:
- Drag and drop
Creating Filters – ORA CFG & PG CFG
Now we have to split configs for oracle and PostgreSQL. We will use Filter activity on rows retrieved in “GET CFG” lookup.
- Drag and drop
 twice.
 - Rename the first block to “ORA CFG“, second to “PG CFG“.
- Now go to “ORA CFG“, then “Settings“.
- In Items, click Add dynamic content and type: @activity('GET CFG').output.value . As you probably guess, this will point directly to GET CFG output rows 🙂
- In Condition, click Add dynamic content and type: @equals(item().SRC_name,'ORA') . We have to match rows for oracle settings. So we know, that there is a column in config table called “SRC_name“. We can use it to filter out all rows, except that with value ‘ORA’ 🙂 .
- Do the same with lookup activity “PG CFG“. Of course, change the value for a condition.
It should look like this:

Creating ForEach – FOR EACH ORA & FOR EACH PG
Now it’s time to iterate over each row filtered in separate containers (ORA CFG and PG CFG).
- Drag and drop two
 blocks, rename them as “FOR EACH ORA” and “FOR EACH PG“. Connect each to proper filter acitivity. Just like in this example:
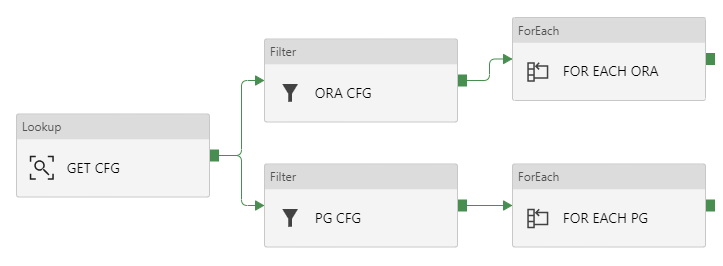
- Click “FOR EACH ORA“, go to “Settings“, in Items clik Add dynamic content and type: @activity('ORA CFG').output.value . We are telling ForEach, that it has to iterate over results returned in “ORA CFG”. They are stored in JSON array.
- Do this also in FOR EACH PG. Type: @activity('PG CFG').output.value
- Now, you can edit Activities and add only “WAIT” activity to debug your pipeline. I will skip this part. Just remember to delete WAIT block at the end of your tests.

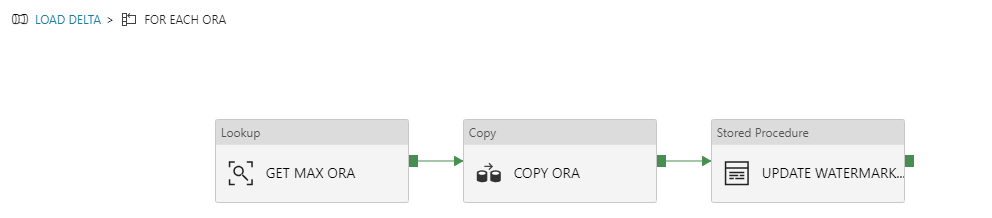
Inside ForEach – GET MAX ORA -> COPY ORA -> UPDATE WATERMARK ORA
Place these blocks into FOR EACH ORA. Justo go there, click “Activities” and then ![]()
And every column in that row, can be reached just by using @item().ColumnName .
Remember, that you can surround every expression in brackets @{ } to use it as a string interpolation. Then you can concatenate it with other strings and expressions just like that: Value of the parameter WatermarkColumn is: @{item().WatermarkColumn}
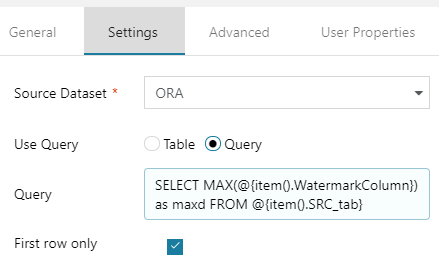
GET MAX ORA
- Go to “GET MAX ORA“, then Settings
- Choose your source dataset “ORA“, Use Query: “Query” and click Add dynamic content
- Type SELECT MAX(@{item().WatermarkColumn}) as maxd FROM @{item().SRC_tab} . This will get a maximum date in your watermark column. We will use it as RIGHT BOUNDRY for delta slice.
- Check if First row only is turned on.
It should look like this:
COPY ORA
Now the most important part :> Copy activity with a lot of parametrized things… So pay attention, it’s not so hard to understand but every detail matters.
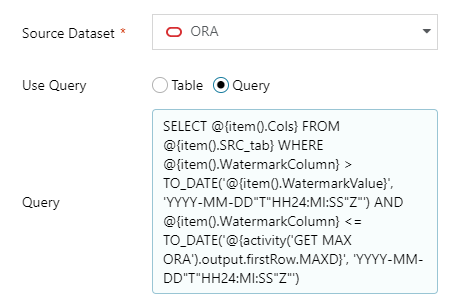
Source
- In source settings, choose Source Dataset to ORA, in Use query select Query.
- Below Query input, click Add dynamic content and paste this:
12345678910SELECT@{item().Cols} FROM @{item().SRC_tab}WHERE@{item().WatermarkColumn} >TO_DATE('@{item().WatermarkValue}', 'YYYY-MM-DD"T"HH24:MI:SS"Z"')AND@{item().WatermarkColumn} <=TO_DATE('@{activity('GET MAX ORA').output.firstRow.MAXD}', 'YYYY-MM-DD"T"HH24:MI:SS"Z"')
Now, this needs some explanation 🙂

- ORA CFG output has all columns and their values from our config.
- We will use SRC_tab as table name, Cols as columns for SELECT query, WatermatkColumn as LastChange DateTime column name and WatermarkValue for LEFT BOUNDRY (greater than, >).
- GET MAX ORA output stores date of a last updated row in the source table. So this is why we are using it as a RIGHT BOUNDRY (less than or equal, <=)
- And the tricky thing, ORACLE doesn’t support implicit conversion from the string with ISO 8601 date. So we need to extract it properly with TO_DATE function.
So the source is a query from ORA dataset:
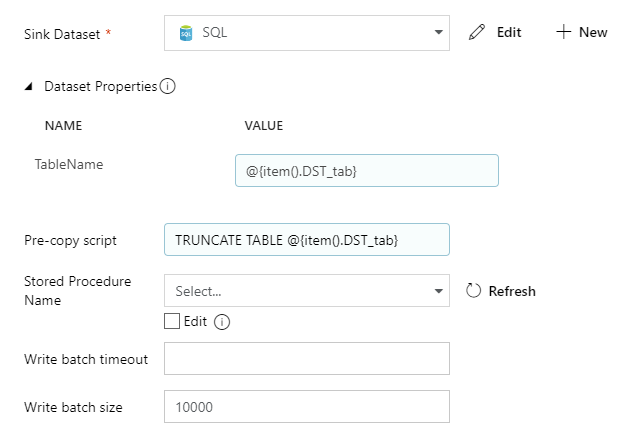
Sink
Sink is our destination. Here we will set parametrized table name and truncate query.
- Select

- Parametrize TableName as dynamic content with value: @{item().DST_tab}
- Also, do the same with Pre-copy script and put there: TRUNCATE TABLE @{item().DST_tab}
It should look like this:
Mappings and Settings
All other things should just be set to defaults. You don’t have to parametrize mappings if you just copy data from and to tables that have the same structure.
Of course, you can dynamically create them if you want, but it is a good practice to transfer data 1:1 – both structure and values from source to staging.
UPDATE WATERMARK ORA
Now we have to confirm, that load has finished and then update previous watermark value with the new one.
We will use a stored procedure. The code is simple:
|
1 2 3 4 5 6 7 8 9 10 11 12 |
CREATE PROC [load].[usp_UpdateWatermark] @id SMALLINT, @NewWatermark DATETIME AS SET NOCOUNT ON; UPDATE load.cfg SET WatermarkValue = @NewWatermark WHERE id = @id; GO |
Create it on your Azure SQL database. Then use it in ADF:
- Drop
 into project, connect constraint from COPY ORA into it. Rename as “UPDATE WATERMARK ORA” and view properties.
 - In SQL Account set

- Now go to “Stored Procedure”, select our procedure name and click “Import parameter”.
- Now w have to pass values for procedure parametrs. And we will also parametrize them. Id should be @{item().id} and NewWatermatk has to be: @{activity('GET MAX ORA').output.firstRow.MAXD} .


And basically, that’s all! This logic should copy rows from all Oracle tables defined in the configuration.
We can now test it. This can be done with “Debug” or just by triggering pipeline run.
If everything is working fine, we can just copy/paste all content from “FOR EACH ORA” into “FOR EACH PG“.
Just remember to properly rename all activities to reflect new source/destination names (PG). Also, all parameters and SELECT queries have to be redefined. Luckily PostgreSQL support ISO dates out of the box.
Source code
Here are all components in JSON. You can use them to copy/paste logic directly inside ADF V2 code editor or save as files in GIT repository.
Below is source code for pipeline only. All other things can be downloaded in zip file in “Download all” at the bottom of this article.
Pipeline
|
1 2 3 4 5 6 7 8 9 10 11 12 13 14 15 16 17 18 19 20 21 22 23 24 25 26 27 28 29 30 31 32 33 34 35 36 37 38 39 40 41 42 43 44 45 46 47 48 49 50 51 52 53 54 55 56 57 58 59 60 61 62 63 64 65 66 67 68 69 70 71 72 73 74 75 76 77 78 79 80 81 82 83 84 85 86 87 88 89 90 91 92 93 94 95 96 97 98 99 100 101 102 103 104 105 106 107 108 109 110 111 112 113 114 115 116 117 118 119 120 121 122 123 124 125 126 127 128 129 130 131 132 133 134 135 136 137 138 139 140 141 142 143 144 145 146 147 148 149 150 151 152 153 154 155 156 157 158 159 160 161 162 163 164 165 166 167 168 169 170 171 172 173 174 175 176 177 178 179 180 181 182 183 184 185 186 187 188 189 190 191 192 193 194 195 196 197 198 199 200 201 202 203 204 205 206 207 208 209 210 211 212 213 214 215 216 217 218 219 220 221 222 223 224 225 226 227 228 229 230 231 232 233 234 235 236 237 238 239 240 241 242 243 244 245 246 247 248 249 250 251 252 253 254 255 256 257 258 259 260 261 262 263 264 265 266 267 268 269 270 271 272 273 274 275 276 277 278 279 280 281 282 283 284 285 286 287 288 289 290 291 292 293 294 295 296 297 298 299 300 301 302 303 304 305 306 307 308 309 310 311 312 313 314 315 316 317 318 319 320 321 322 323 324 325 326 327 328 329 330 331 332 333 334 335 336 337 338 339 340 341 342 343 344 345 346 347 348 349 350 351 352 353 354 355 356 357 358 359 360 361 362 363 364 365 366 367 368 369 370 371 372 373 374 375 376 |
{ "name": "LOAD DELTA", "properties": { "activities": [ { "name": "GET CFG", "type": "Lookup", "policy": { "timeout": "7.00:00:00", "retry": 0, "retryIntervalInSeconds": 30, "secureOutput": false }, "typeProperties": { "source": { "type": "SqlSource", "sqlReaderQuery": { "value": "SELECT * from @{pipeline().parameters.ConfigTable}\nIF @@ROWCOUNT = 0 THROW 50000,'ojej...',1", "type": "Expression" } }, "dataset": { "referenceName": "SQL", "type": "DatasetReference", "parameters": { "TableName": "dummy" } }, "firstRowOnly": false } }, { "name": "FOR EACH ORA", "type": "ForEach", "dependsOn": [ { "activity": "ORA CFG", "dependencyConditions": [ "Succeeded" ] } ], "typeProperties": { "items": { "value": "@activity('ORA CFG').output.value", "type": "Expression" }, "isSequential": false, "activities": [ { "name": "COPY ORA", "type": "Copy", "dependsOn": [ { "activity": "GET MAX ORA", "dependencyConditions": [ "Succeeded" ] } ], "policy": { "timeout": "7.00:00:00", "retry": 0, "retryIntervalInSeconds": 30, "secureOutput": false }, "userProperties": [ { "name": "Destination", "value": "@{item().DST_tab}" } ], "typeProperties": { "source": { "type": "OracleSource", "oracleReaderQuery": { "value": "SELECT \n @{item().Cols} FROM @{item().SRC_tab} \n\nWHERE \n\n@{item().WatermarkColumn} > \nTO_DATE('@{item().WatermarkValue}', 'YYYY-MM-DD\"T\"HH24:MI:SS\"Z\"')\nAND\n@{item().WatermarkColumn} <=\nTO_DATE('@{activity('GET MAX ORA').output.firstRow.MAXD}', 'YYYY-MM-DD\"T\"HH24:MI:SS\"Z\"')", "type": "Expression" } }, "sink": { "type": "SqlSink", "writeBatchSize": 10000, "preCopyScript": { "value": "TRUNCATE TABLE @{item().DST_tab}", "type": "Expression" } }, "enableStaging": false, "cloudDataMovementUnits": 0 }, "inputs": [ { "referenceName": "ORA", "type": "DatasetReference" } ], "outputs": [ { "referenceName": "SQL", "type": "DatasetReference", "parameters": { "TableName": { "value": "@{item().DST_tab}", "type": "Expression" } } } ] }, { "name": "GET MAX ORA", "type": "Lookup", "policy": { "timeout": "7.00:00:00", "retry": 0, "retryIntervalInSeconds": 30, "secureOutput": false }, "typeProperties": { "source": { "type": "OracleSource", "oracleReaderQuery": { "value": "SELECT MAX(@{item().WatermarkColumn}) as maxd FROM @{item().SRC_tab} ", "type": "Expression" } }, "dataset": { "referenceName": "ORA", "type": "DatasetReference" } } }, { "name": "UPDATE WATERMARK ORA", "type": "SqlServerStoredProcedure", "dependsOn": [ { "activity": "COPY ORA", "dependencyConditions": [ "Succeeded" ] } ], "policy": { "timeout": "7.00:00:00", "retry": 0, "retryIntervalInSeconds": 30, "secureOutput": false }, "typeProperties": { "storedProcedureName": "[load].[usp_UpdateWatermark]", "storedProcedureParameters": { "id": { "value": { "value": "@{item().id}", "type": "Expression" }, "type": "Int16" }, "NewWatermark": { "value": { "value": "@{activity('GET MAX ORA').output.firstRow.MAXD}", "type": "Expression" }, "type": "DateTime" } } }, "linkedServiceName": { "referenceName": "AzureSQL", "type": "LinkedServiceReference" } } ] } }, { "name": "ORA CFG", "type": "Filter", "dependsOn": [ { "activity": "GET CFG", "dependencyConditions": [ "Succeeded" ] } ], "typeProperties": { "items": { "value": "@activity('GET CFG').output.value", "type": "Expression" }, "condition": { "value": "@equals(item().SRC_name,'ORA')", "type": "Expression" } } }, { "name": "PG CFG", "type": "Filter", "dependsOn": [ { "activity": "GET CFG", "dependencyConditions": [ "Succeeded" ] } ], "typeProperties": { "items": { "value": "@activity('GET CFG').output.value", "type": "Expression" }, "condition": { "value": "@equals(item().SRC_name,'PG')", "type": "Expression" } } }, { "name": "FOR EACH PG", "type": "ForEach", "dependsOn": [ { "activity": "PG CFG", "dependencyConditions": [ "Succeeded" ] } ], "typeProperties": { "items": { "value": "@activity('PG CFG').output.value", "type": "Expression" }, "isSequential": false, "activities": [ { "name": "Copy PG", "type": "Copy", "dependsOn": [ { "activity": "GET MAX PG", "dependencyConditions": [ "Succeeded" ] } ], "policy": { "timeout": "7.00:00:00", "retry": 0, "retryIntervalInSeconds": 30, "secureOutput": false }, "userProperties": [ { "name": "Destination", "value": "@{item().DST_tab}" } ], "typeProperties": { "source": { "type": "RelationalSource", "query": { "value": "SELECT @{item().Cols} FROM @{item().SRC_tab} \n\nWHERE \n\n@{item().WatermarkColumn} > \n'@{item().WatermarkValue}'\nAND\n@{item().WatermarkColumn} <=\n'@{activity('GET MAX PG').output.firstRow.MAXD}'", "type": "Expression" } }, "sink": { "type": "SqlSink", "writeBatchSize": 10000, "preCopyScript": { "value": "TRUNCATE TABLE @{item().DST_tab}", "type": "Expression" } }, "enableStaging": false, "cloudDataMovementUnits": 0 }, "inputs": [ { "referenceName": "PG", "type": "DatasetReference" } ], "outputs": [ { "referenceName": "SQL", "type": "DatasetReference", "parameters": { "TableName": { "value": "@{item().DST_tab}", "type": "Expression" } } } ] }, { "name": "GET MAX PG", "type": "Lookup", "policy": { "timeout": "7.00:00:00", "retry": 0, "retryIntervalInSeconds": 30, "secureOutput": false }, "typeProperties": { "source": { "type": "RelationalSource", "query": { "value": "SELECT MAX(@{item().WatermarkColumn}) as maxd FROM @{item().SRC_tab} ", "type": "Expression" } }, "dataset": { "referenceName": "PG", "type": "DatasetReference" } } }, { "name": "UPDATE WATERMARK PG", "type": "SqlServerStoredProcedure", "dependsOn": [ { "activity": "Copy PG", "dependencyConditions": [ "Succeeded" ] } ], "policy": { "timeout": "7.00:00:00", "retry": 0, "retryIntervalInSeconds": 30, "secureOutput": false }, "typeProperties": { "storedProcedureName": "[load].[usp_UpdateWatermark]", "storedProcedureParameters": { "id": { "value": { "value": "@{item().id}", "type": "Expression" }, "type": "Int16" }, "NewWatermark": { "value": { "value": "@{activity('GET MAX PG').output.firstRow.MAXD}", "type": "Expression" }, "type": "DateTime" } } }, "linkedServiceName": { "referenceName": "AzureSQL", "type": "LinkedServiceReference" } } ] } } ], "parameters": { "ConfigTable": { "type": "String", "defaultValue": "load.cfg" } } } } |
Download all
Hi Michal,
I have used all the convert functions you have said above like
CONVERT(NVARCHAR(100), CONVERT(datetime, @{item().WatermarkValue}, 127), 120)
but still am getting the error as
{
“errorCode”: “2100”,
“message”: “Failure happened on ‘Source’ side. ErrorCode=SqlOperationFailed,’Type=Microsoft.DataTransfer.Common.Shared.HybridDeliveryException,Message=A database operation failed with the following error: ‘Incorrect syntax near ‘T00:’.’,Source=,”Type=System.Data.SqlClient.SqlException,Message=Incorrect syntax near ‘T00:’.,Source=.Net SqlClient Data Provider,SqlErrorNumber=102,Class=15,ErrorCode=-2146232060,State=1,Errors=[{Class=15,Number=102,State=1,Message=Incorrect syntax near ‘T00:’.,},],'”,
“failureType”: “UserError”,
“target”: “GET_MIN_SRC_RTT”,
“details”: []
}
My requirement here is am trying to read the DATE from the look up and the same I need to pass to the COPY data.
Could you please help me here as am struck here?
Regards,
Mahasweta
Hmm, we need to analyze what exactly is passed to the procedure, like Ashish analyzed in previous comments.
And by the way, which SQL servers are you using? I mean for watermarks and as a source?
Amazing Solution & thank for sharing Michal.
I’m currently working on similar solution but I’m not using CopyActivity rather I’ve list of stored procedure with business logic in the database which need to be invoked dynamically and for that I’ve maintained similar Config table.
In this config table, I’ve list of database stored procedure & ADF pipelines that need to be executed as a part of orchestration since there are dependencies on each others so i added pipelines names in config table too so it can follow the sequence when running in the loop, when i retrieve config table in LOOKUP activity i get both execution name & execution method(SP or ADf pipeline) so i can invoke 2 different activity 1) stored procedure 2) pipeline
I can set expression for stored procedure activity and dynamically invoke respective stored procedure. However, I’m not able to set pipeline name dynamically using expression in Execute Pipeline activity and It’s not allow to invoke a pipeline dynamically by accepting parameter for pipeline reference name.
I tried various option but it looks like invoke pipeline can’t pass dynamically with help of parameters
Any idea, how to set pipeline name dynamically using expression in Execute Pipeline activity?
Looking forward to hear from you.
Thanks
Nilesh
Hi Nilesh.
Sorry for a late reply. I’m a little busy these days..
You are right. Pipeline execution can only be parametrized, if I can say like that – at parameters scope level 😐 There is no exposed way to define its name as parameter, as far as I can see.
The only solution, that I can think of now, would be a master pipeline to execute all possible pipelines in your data factory, but limited by using proper activity – like SWITCH. You can then control the flow and decide to run only one pipeline depending on a passed parameter. It will take a lot of effort to do it, but unfortunately I’m not sure what else you can do here 😐
So:
1. Create MASTER pipeline from scratch, add parameter which will handle the pipeline name you want to execute
2. Add switch activity, create expression to validate the value passed s parameter to the master pipeline
3. Add as many cases as you have pipelines to run. Hardcode the value of your pipelines in case value
4. Just add corresponding execute pipeline activity into each case activity, hardcode the pointer to the pipeline.
And that’s it. You can now run master pipeline with parameter pointing to a proper pipeline.
Also, if I were you, I would create an algorithm (like in powershell or python) to create automatically a native JSON block for this SWITCH just to give my script a list of all pipelines and it would generate something, that I can inject in portal or in git repo 🙂 Just a trick to not to waste my time for drag’n’dropping now and in the future 😉
Hope this helps you somehow.
Regards.
m.
Thanks Michal, you are right but i figured out the solution to avoid hardcode values for pipeline name. I used Web Activity to submit REST calls to ADF api to create a pipeline run.
Documentation for API call https://docs.microsoft.com/en-us/rest/api/datafactory/pipelines/createrun
That is ok if you do not want to track pipeline flow, since running REST works as a asynchronous process.
In other words, you can’t control the run of the pipeline but for sure you can implement a logic that will check the status periodically by firing another rest call.
Also, bear in mind, that in case of web activity: “The activity will timeout at 1 minute with an error if it does not receive a response from the endpoint.” https://docs.microsoft.com/en-us/azure/data-factory/control-flow-web-activity#type-properties
It’s just an internal timeout in ADF and it happened for me two or three times, that Azure API did not respond in one minute 😐 (not particularly in ADF API, but anyway). So maybe just do not forget to implement some retry logic 🙂
So if it does meet you requirements, then I’m happy that you figured it out 🙂 Thanks for the update!
Hi Michael, I am very grateful for your article, it helped me a lot because I had never done an incremental load and I had no idea how to do it, nor was it a configuration table. I hope you continue to upload important content.
Thanks in advance.
Thank you for the kind words!
I am glad that the over two-year article is still useful in such a rapidly changing environment as Azure.
Hi Michal, thank you for the post.
I’m doing some tests and researches about build a metadata layer for pipelines and your post it’s very helpful.
Unfortunately, my source systems doesn’t have an update_date column on tables, so, I will need to build incremental load using the transactions date fields, like OrderDate, and I will need to reprocess, for example, the last month, every day, to try keep the data on Azure up to date.
Would you have any advice about this requirement?
Have you already worked in a similar one?
Thanks a lot!
Renato Freitas
Hi Renato!
Each application can have potentially different date methods. It is important to know the volume of data that changes each day and how the order date changes too. So you need to make sure that there are no traps behind such a mechanism and the pipeline will do everything as it should.
Also, remember that you should always try to perform the tasks at the lowest cost. More data means longer operation time and more information flowing through the network. And thus it increases costs. So if the total costs of downloading the data daily, but always asking for the last month, are not higher than the cost of tracking mechanism implementation, e.g. Change Data Capture, then this is a good solution. Otherwise, I would like to think about whether it is worth to burn money. The cloud teaches you the right, minimalist approach, and requires extensive knowledge of costs.
Regards,
m.
Thanks for the tips!!
Thank you so much Michal,
I am using azure sql database.
I have copy data and data flow in my pipeline, I want to use the variable in my sink in the data flow.
My steps:
1. Create variable on the pipeline
NAME TYPE DEFAULT VALUE
TimeVal String empty
then tried to reference it in my query but not sure the syntax is right
2. The referencing is the problem, can you write the right syntax please ?
update Life_master set last_upd_dt =(@pipeline().Pipeline.TimeVal) where job_id = 2 ?
It looks like I am missing some steps,
can you please give me an example of the whole process including setting up the global timestamp, referencing it. Thanks,
Hope
Hmm, ok.
You need to read this article first, as it is a different case and you need to parametrize a data flow and pass a value from the pipeline:
https://docs.microsoft.com/en-us/azure/data-factory/parameters-data-flow
Anyway, you need to follow a very simple pattern in case of passing date from a variable/parameter to the datetime (and other) column:
– use brackets (As you always do when passing date as a string into table)
– extract the proper date as you need, from your parameter/variable, using proper functions
For example, I have a simple table, like yours (open all links in a new tab):
http://sql.pawlikowski.pro/wp-content/uploads/2020/07/01.jpg
I’m using ‘Set Variable’ activity to assign dynamic content “utcnow()” into pipeline variable “TimeVal”.
The returned result of this function (and activity) is:
http://sql.pawlikowski.pro/wp-content/uploads/2020/07/02.jpg
Now, to update a value in the database normally I would use a stored procedure.
But this time I will use a little trick to make this faster.
ADF does not have TSQL script activity as SSIS do, so we can use Lookup activity and return dummy result (as it needs something) and run some logic before it.
Just remember to use procedure in your case, ok? ;D
And the dynamic content, it looks like this:
http://sql.pawlikowski.pro/wp-content/uploads/2020/07/03.jpg
The code is:
update Life_master set last_upd_dt ='@{formatDateTime(variables('TimeVal'), 'yyyy-MM-dd HH:mm:ss')}' where job_id = 2;SELECT 0 as dummy
You can specify more details on the date, like milliseconds accordingly to the .NET custom date format specification:
https://docs.microsoft.com/en-us/dotnet/standard/base-types/custom-date-and-time-format-strings#ssSpecifir
And the final result is:
http://sql.pawlikowski.pro/wp-content/uploads/2020/07/04.jpg
So, you can prepare a variable, just like I did in the dynamic content, using functions, then you can pass it directly to the data flow.
On the other hand, I’m curious why you need to set those dates inside data flow, not outside, directly in the pipeline. It’s just a metadata step, but I guess it always depends on a scenario 😐
I hope I helped you.
Thank you Michal,
The reason why I am updating the date in the sink data flow is:
There is Last Updated date column in the source at the beginning of my pipeline and wanted to to update that at the sink after all the transformations. However, I don’t want to loss any incoming data between this process. As a result, I want to capture the time the data flow strats at the source and wanted to use the time variable in my update query at the sink. In that case, if my date flow transformation takes 5 minutes to finish, all the incoming data at that time interval will not be lost.
I will try to use your approach and let you know. However, For some internal reason ,I can not use stored procedures in my data flow. Do you think this is the right approach?
Let me know your thoughts.
Regards,
Hope
Hi Hope.
Hmm, I’m feeling that I do not get it right but anyway, few points:
– in case of changing anything to the column values, during the transformation process, just don’t forget that there is a derived transformation which will bring anything you want to save to your sink data, as a newly created column or replace the old one:
https://docs.microsoft.com/en-us/azure/data-factory/data-flow-derived-column
– well, if you can’t create a procedure inside the database, the lookup trick is one of the workarounds. It does work, but of course is just not a good practice (as any “modifying” process hardcoded into external tools, like Azure Data Factory, can be harmful in many ways ;] tracking changes, maintaining the logic, etc., but that’s just a rule of thumb, nothing more)
Good luck 🙂
Hello Michal,
As I am new to Azure ADF, this has been very helpful.
I really appriciate your support and quick replies. I am now using your template and working on it.
Quick question,
I have a data column called ACTIVE with a data of 0 and 1 in my source. I want to transform these to Y and N in my data flow and used the replace function and created a derived column to do that. However, it is changing all the data to Y or N.
Here is my step using replace function:
replace(‘1’, ‘1’, ‘Y’) —to change it to Y and
replace(‘0’, ‘0’, ‘N’) — to change it to N
what is the problem with that and how can I correct to make both changes at the same time?
Regards,
Hope
I have SOURCE like
HOST = @item().SRC_HOST
DB = @item().SRC_DB
SCHEMA = @item().SRC_SCHEMA
TABLE = @item().SRC_TABLE
How can I select table using all above 4 parameter to get accurate table data. like SELECT * FROM @{item().SRC_HOST}].[@{item().SRC_DB}].[@{item().SRC_SCHEMA}].[@{item().SRC_TABLE}]
I have to write SELECT because i have additional column TARGET table (TRG_), and via BULK INSERT i am not able to do TABLE copy. Below JSON code
{
“name”: “STG_AGILYSYS_test”,
“properties”: {
“activities”: [
{
“name”: “forEachShip”,
“type”: “ForEach”,
“dependsOn”: [
{
“activity”: “lookupShip”,
“dependencyConditions”: [
“Succeeded”
]
}
],
“userProperties”: [],
“typeProperties”: {
“items”: {
“value”: “@activity(‘lookupShip’).output.value”,
“type”: “Expression”
},
“activities”: [
{
“name”: “SQLtoSQLDW”,
“type”: “Copy”,
“dependsOn”: [],
“policy”: {
“timeout”: “7.00:00:00”,
“retry”: 0,
“retryIntervalInSeconds”: 30,
“secureOutput”: false,
“secureInput”: false
},
“userProperties”: [],
“typeProperties”: {
“source”: {
“type”: “SqlServerSource”,
“sqlReaderQuery”: “select \n chk_ftr_line1,\nchk_ftr_line2,\nchk_ftr_line3,\nchk_hdr_line1,\nchk_hdr_line2,\nchk_hdr_line3,\ndata_control_group_id,\ndefault_table_layout_id,\ndoc_lines_advance,\nent_id,\nmax_doc_lines_page,\nmin_rcpt_lines_page,\nprint_by_rev_cat_flag,\nprofit_center_id] int,\nprofit_center_name,\nprofit_ctr_abbr1,\nprofit_ctr_abbr2,\nsales_tippable_flag,\nstore_id,\nmerchant_id,\nbypass_CC_agency_threshold_amount,\nbypass_CC_voice_auth_threshold_amount,\nbypass_CC_printing_threshold_amount,\nprimary_language_id,\nsecondary_language_id,\ntip_max_percent,\ntip_enforcement_code_id,\nprofit_center_desc,\nsource_property_code,\npole_display_open,\npole_display_closed,\nrow_version \nfrom [@{item().SRC_SCHEMA}].[@{item().SRC_TABLE}]”,
“queryTimeout”: “02:00:00”
},
“sink”: {
“type”: “SqlDWSink”,
“preCopyScript”: “TRUNCATE table STG_AGILYSYS_CT.temp_Profit_Center_Master”,
“disableMetricsCollection”: false
},
“enableStaging”: false,
“translator”: {
“type”: “TabularTranslator”,
“typeConversion”: true,
“typeConversionSettings”: {
“allowDataTruncation”: true,
“treatBooleanAsNumber”: false
}
}
},
“inputs”: [
{
“referenceName”: “AgilysysSqlServer”,
“type”: “DatasetReference”,
“parameters”: {
“HOST”: {
“value”: “@item().SRC_HOST”,
“type”: “Expression”
},
“DB”: {
“value”: “@item().SRC_SCHEMA”,
“type”: “Expression”
},
“TABLE”: {
“value”: “@item().SRC_TABLE”,
“type”: “Expression”
}
}
}
],
“outputs”: [
{
“referenceName”: “SqlDWDataAgilysys”,
“type”: “DatasetReference”,
“parameters”: {
“tableName”: {
“value”: “@item().TRG_TEMP_TABLE”,
“type”: “Expression”
},
“schemaname”: {
“value”: “@item().TRG_SCHEMA_NAME”,
“type”: “Expression”
}
}
}
]
}
]
}
},
{
“name”: “lookupShip”,
“type”: “Lookup”,
“dependsOn”: [],
“policy”: {
“timeout”: “7.00:00:00”,
“retry”: 0,
“retryIntervalInSeconds”: 30,
“secureOutput”: false,
“secureInput”: false
},
“userProperties”: [],
“typeProperties”: {
“source”: {
“type”: “SqlDWSource”,
“sqlReaderQuery”: “SELECT SRC_SHIP_CODE, SRC_HOST, SRC_SCHEMA, SRC_TABLE, \nsubstring(TRG_TEMP_TABLE,1,charindex(‘.’, TRG_TEMP_TABLE)-1) as TRG_SCHEMA_NAME, \nsubstring(TRG_TEMP_TABLE, charindex(‘.’, TRG_TEMP_TABLE)+1,100) \n as \n TRG_TEMP_TABLE \nFROM \n STG_CONTACT_TRACING.ETL_LOAD_DETAIL \nWHERE SRC_STATUS = ‘A’ \nAND SRC_NAME = ‘AGILYSYS’;”,
“queryTimeout”: “02:00:00”
},
“dataset”: {
“referenceName”: “devEtlLoadDetail”,
“type”: “DatasetReference”
},
“firstRowOnly”: false
}
}
],
“folder”: {
“name”: “Kiana”
},
“annotations”: []
}
}
Hi Vikas.
Please provide the error message that you have.
The SELECT statement is missing one opening bracket next to the host name, but everything else looks properly. Of course remember to add it as a “dynamic content” not just by pasting it to the query field.
This is a fully qualified name notation, and you can reference local and remote data with it. For now I can’t tell you what is wrong.
My question was
I have dynamic SOURCE like
HOST = @item().SRC_HOST
DB = @item().SRC_DB
SCHEMA = @item().SRC_SCHEMA
TABLE = @item().SRC_TABLE
In want to use QUERY, which will use the dynamic SELECT query
How can I select table using all above 4 parameter to get accurate table data. like
SELECT * FROM @{item().SRC_HOST}].[@{item().SRC_DB}].[@{item().SRC_SCHEMA}].[@{item().SRC_TABLE}]
I am doing this because I have 39 source system having same table, which i will load in one Target table, Also I want to put CDC logic.
Getting error when doing so
{
“errorCode”: “2200”,
“message”: “Failure happened on ‘Source’ side. ‘Type=System.Data.SqlClient.SqlException,Message=Must declare the table variable \”@item\”.,Source=.Net SqlClient Data Provider,SqlErrorNumber=1087,Class=15,ErrorCode=-2146232060,State=2,Errors=[{Class=15,Number=1087,State=2,Message=Must declare the table variable \”@item\”.,},],'”,
“failureType”: “UserError”,
“target”: “SQLtoSQLDW”,
“details”: []
}
CODE BELOW
{
“name”: “STG_AGILYSYS_CONTACT_TRACING_ORDER_HEADER”,
“properties”: {
“description”: “This job is used to migrate Delta changes (SCD type 1 ) from 39 ships data to Synapse SQL DW for ORDER_HEADER table”,
“activities”: [
{
“name”: “forEachShip”,
“type”: “ForEach”,
“dependsOn”: [
{
“activity”: “lookupShip”,
“dependencyConditions”: [
“Succeeded”
]
}
],
“userProperties”: [],
“typeProperties”: {
“items”: {
“value”: “@activity(‘lookupShip’).output.value”,
“type”: “Expression”
},
“isSequential”: false,
“activities”: [
{
“name”: “SQLtoSQLDW”,
“type”: “Copy”,
“dependsOn”: [],
“policy”: {
“timeout”: “7.00:00:00”,
“retry”: 0,
“retryIntervalInSeconds”: 30,
“secureOutput”: false,
“secureInput”: false
},
“userProperties”: [],
“typeProperties”: {
“source”: {
“type”: “SqlServerSource”,
“additionalColumns”: [
{
“name”: “ship_cd”,
“value”: {
“value”: “@item().SRC_SHIP_CODE”,
“type”: “Expression”
}
}
],
“sqlReaderQuery”: “select * from \t\n@item().SRC_HOST.@item().SRC_SCHEMA.\t\n@item().SRC_TABLE”,
“queryTimeout”: “02:00:00”
},
“sink”: {
“type”: “SqlDWSink”,
“disableMetricsCollection”: false
},
“enableStaging”: false,
“translator”: {
“type”: “TabularTranslator”,
“typeConversion”: true,
“typeConversionSettings”: {
“allowDataTruncation”: true,
“treatBooleanAsNumber”: false
}
}
},
“inputs”: [
{
“referenceName”: “AgilysysSqlServer”,
“type”: “DatasetReference”,
“parameters”: {
“HOST”: {
“value”: “@item().SRC_HOST”,
“type”: “Expression”
},
“DB”: {
“value”: “@item().SRC_SCHEMA”,
“type”: “Expression”
},
“TABLE”: {
“value”: “@item().SRC_TABLE”,
“type”: “Expression”
}
}
}
],
“outputs”: [
{
“referenceName”: “SqlDWDataAgilysys”,
“type”: “DatasetReference”,
“parameters”: {
“tableName”: {
“value”: “@item().TRG_TEMP_TABLE”,
“type”: “Expression”
},
“schemaname”: {
“value”: “@item().TRG_SCHEMA_NAME”,
“type”: “Expression”
}
}
}
]
}
]
}
},
{
“name”: “lookupShip”,
“type”: “Lookup”,
“dependsOn”: [],
“policy”: {
“timeout”: “7.00:00:00”,
“retry”: 0,
“retryIntervalInSeconds”: 30,
“secureOutput”: false,
“secureInput”: false
},
“userProperties”: [],
“typeProperties”: {
“source”: {
“type”: “SqlDWSource”,
“sqlReaderQuery”: “TRUNCATE table STG_AGILYSYS_CT.Order_Header_Temp\n\nSELECT SRC_SHIP_CODE, SRC_HOST, SRC_SCHEMA, SRC_TABLE, \nsubstring(TRG_TEMP_TABLE,1,charindex(‘.’, TRG_TEMP_TABLE)-1) as TRG_SCHEMA_NAME, \nsubstring(TRG_TEMP_TABLE, charindex(‘.’, TRG_TEMP_TABLE)+1,100) \n as \n TRG_TEMP_TABLE \nFROM \n STG_CONTACT_TRACING.ETL_LOAD_DETAIL \nWHERE SRC_STATUS = ‘A’ \nAND SRC_NAME = ‘AGILYSYS’\nand SRC_TABLE=’Order_Header’;”,
“queryTimeout”: “02:00:00”
},
“dataset”: {
“referenceName”: “devEtlLoadDetail”,
“type”: “DatasetReference”
},
“firstRowOnly”: false
}
},
{
“name”: “SP_Agilysys_Contact_Tracing”,
“type”: “SqlServerStoredProcedure”,
“dependsOn”: [
{
“activity”: “forEachShip”,
“dependencyConditions”: [
“Succeeded”
]
}
],
“policy”: {
“timeout”: “7.00:00:00”,
“retry”: 0,
“retryIntervalInSeconds”: 30,
“secureOutput”: false,
“secureInput”: false
},
“userProperties”: [],
“typeProperties”: {
“storedProcedureName”: “[dbo].[sp_Agilysys_Contact_Tracing]”,
“storedProcedureParameters”: {
“table_name”: {
“value”: {
“value”: “@activity(‘lookupShip’).output”,
“type”: “Expression”
},
“type”: “String”
}
}
},
“linkedServiceName”: {
“referenceName”: “DevSynapse”,
“type”: “LinkedServiceReference”
}
}
],
“folder”: {
“name”: “Kiana”
},
“annotations”: []
}
}
Hi Michal.
Thank you for a great article! Can we replace our configuration table with a configuration file in json format that will be stored in blob storage? If yes, what will be an approach to update the watermark value in this file?
Thank you!
Hi Alex.
Hmm, I didn’t try, but I guess that this will not be possible without some external logic, since writing to JSON file is natively supported only in COPY activity and this will not let you save any variable content without a source. So either mapping data flow or azure function, unfortunately I do not have any pattern here. Just remember that concurrency over JSON files can be tricky, so I would suggest creating dedicated JSON file per source rather than having one for all ingestions.
Thank you, Michal!
What would be the best approach if
1. some tables have 2 watermark columns (create and last modified dates)
2. some record have NULL values in watermark fields
Thanks,
Alex
Hello:
Do you have article where your SINK is Parquet file in Blobstorage ?
Hi Jay.
Unfortunately no, I do not have any article on Parquet files.
Sinking data into compressed columnstore storage such Parquet can be done using native sink destination, by using Databricks and Mapping Data Flows or by leveraging SSIS in Self Hosted SSIS IR.
There are some patterns, like to use partitioning to speed up future requests, but in general you should parametrize all aspects of your destination just by using advanced ADF parametrization tabs (different for each method, but in all of them you can dynamically change importent configs)
Thank you Michal for your reply.
Hi Michal,
Great explanation!!! Please, I want to hear your inputs for the following:
1. In your “cfg” table, you’ve used “Cols” and I want to remove this and make this even more dynamic (for now, let us assume that the source and destination are MS SQL DBs only).
The idea is that the target table gets inserted or updated based on the Business Key (also defined in my CFG table) and also adjust the target table’s IUD_FLAG (InsertUpdateDelete flag column) as “I” when the incoming business key is not found in the target and “U” when any/all of the non-key columns in the source are different from the target (hash of all non-business key columns) and “D” when the row in the target table is not present in the incoming source!
I’m facing an issue when doing the Update, i.e., the source and the target are NOT identical in structure as the target has additional columns (think of calculated fields or dynamic columns etc). So, to solve this we have to dynamically calculate the row hash only for the common columns between the source and the target and I’m not able to do this dynamically!
SRC: *C1, C2, C3, C4, C5, C6, C7, C8
TRG: *C1, C2, C3, , CC5, CC6, CC7
Hashing should be done only for C2 & C3 on both the source and target.
MAPPINGS: C2–>C2, C3–>C3
2. Assuming target is Azure Synapse or Azure SQL, will there be any difference in performance in doing (a BIG table):
(a) copy the source to ADLSv2 and populated target from ADLSv2
(b) directly reading from source and transform and persist in target?
Which is preferred and possibly why? Thanks for your patience.
Regards,
Uday
Hi Uday,
Definitely, the difference in the way data should be loaded is significant!
Azure Synapse is a completely different architecture that requires us to take a special and neat approach for data loads. Starting with ELT rather than ETL, using PolyBase (or quite new COPY command) and landing table distribution (round robin vs hash). Some of the best practices can be found here: https://docs.microsoft.com/en-us/azure/synapse-analytics/sql-data-warehouse/sql-data-warehouse-best-practices
Another key aspect of keeping data first in data lake, is to reduce the load of the source. Once you will upload data into storage, you just don’t need to query it once again from your source to ingest into database. You separate ingestion mechanism from the destination for the sake of error pruning (you can keep working ingestion to dl while upload to synpase can fail i.e.x for cloumn type mismatch).
But for Synapse, going through azure storage is crucial and in my opinion obligatory, because of Synap’s MPP architecture. TDS in Azure Synpase is very very slow and PolyBase/COPY is the only key to perform data loads correctly. For more detials check this doc page: https://docs.microsoft.com/en-us/azure/synapse-analytics/sql-data-warehouse/design-elt-data-loading
For Azure SQL – you need to remember, that any type of Azure SQL Database is not optimal for larga data volume ingestions (becase of FULL recovery model that makes good SLA with data replication). Even hyperscale can be not efficient here, so watch out! Azure SQL are dedicated for OLTP applications, Hyperscale is considered HTAP (hybrid) with a lot of drawbacks when it comes to data load speed.
And Synpase does not provide FULL recovery model, instead you have read uncomitted isolation level by default (and of course there is non automatic failover nor any replication mechanism, just pure backups)
Thank you Michal! Much appreciated. Looking forward to read much more.
Regards,
Uday